> ## Documentation Index
> Fetch the complete documentation index at: https://rwx.reclear.io/llms.txt
> Use this file to discover all available pages before exploring further.
# Run your first CI workflow in RWX
> Run tests and lint in RWX Cloud, then see an unchanged run reuse cached results.
Run a Node.js project's tests and lint checks in RWX Cloud. Then run the same
workflow again and see RWX reuse the results from its cache.
You need Git, a terminal, and an RWX account. RWX installs Node.js and the project
dependencies in the cloud.
## Before you start
[Create an RWX account](https://cloud.rwx.com/_/signup) and create or join an
organization. Complete the account verification shown in onboarding so your
trial credit is available. If your trial is waiting for verification, connect a
supported version-control provider or use the support option shown on that page.
This exercise clones a public repository. You can use it after trial activation
without granting RWX access to one of your own private repositories.
Check that Git is installed:
```sh theme={null}
git --version
```
You should see a Git version number.
## 1. Install the CLI and sign in
On macOS or Windows Subsystem for Linux, install the CLI with Homebrew:
```sh theme={null}
brew install rwx-cloud/tap/rwx
```
On Linux, follow [Installing the CLI](https://www.rwx.com/docs/cli), then continue
with these commands:
```sh theme={null}
rwx --version
rwx login
```
In the browser, choose the RWX organization you want to use. To limit this
device's permissions to workflows, turn off **Inherit all of your permissions**,
select **None**, then select **Manage** under **Runs**. RWX also selects
**Create** and **Read**, allowing the CLI to start, inspect, cancel, and retry runs.
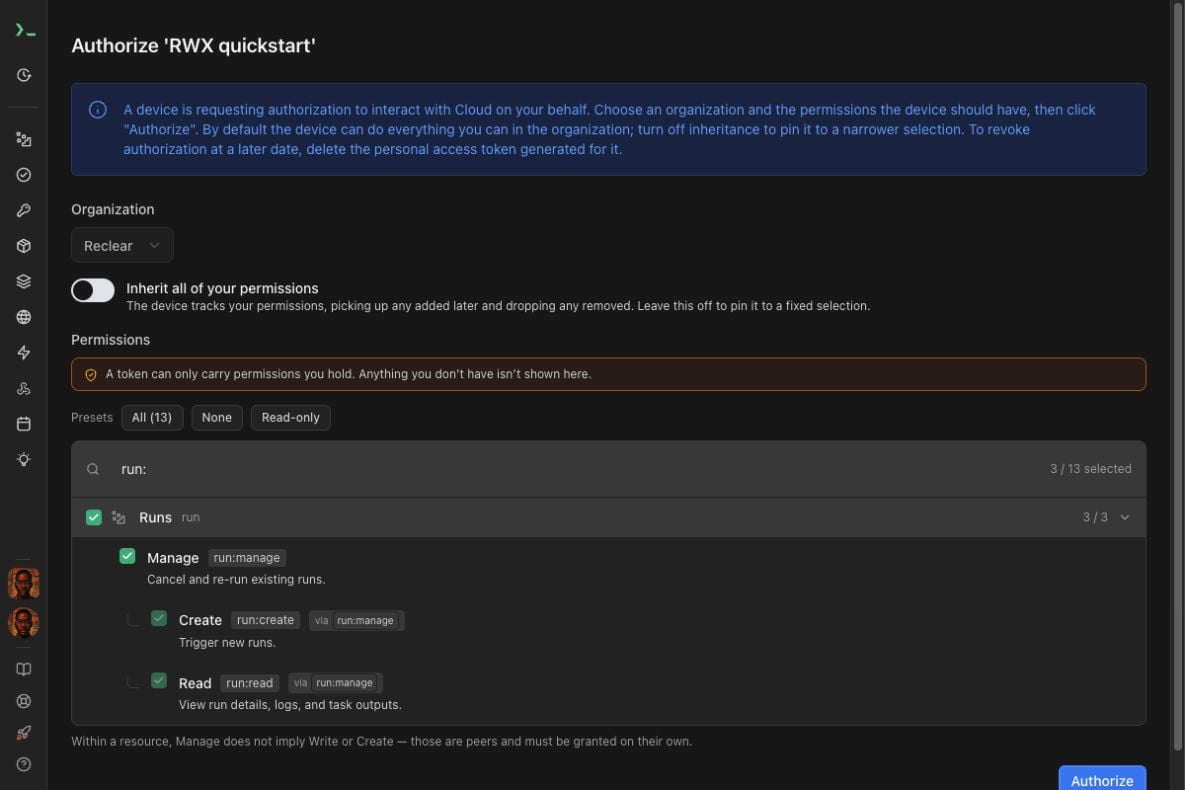 The example shows the **Runs** permissions using the `run:` search filter.
Select **Authorize**, then return to your terminal.
Confirm the CLI is signed in:
```sh theme={null}
rwx whoami
```
Check that the **Organization** line names the organization you selected.
## 2. Get the example project
Clone the public example and create a local branch at the version used in this
exercise:
```sh theme={null}
git clone https://github.com/rwx-cloud/ci-examples.git rwx-quickstart
cd rwx-quickstart
git switch --create quickstart 03095ad1675765ff77665ecd0bfeb69ec722cc65
```
The project has 20 unit tests and a lint check. Keep your terminal in
`rwx-quickstart` for the rest of this guide.
## 3. Add the workflow
Create `.rwx/quickstart.yml` and paste in this complete definition:
```yaml theme={null}
on:
cli:
init:
commit-sha: ${{ event.git.sha }}
base:
image: ubuntu:24.04
config: rwx/base 1.2.0
tasks:
- key: code
call: git/clone 2.2.0
with:
repository: https://github.com/rwx-cloud/ci-examples.git
ref: ${{ init.commit-sha }}
- key: node
call: nodejs/install 1.2.0
with:
node-version: "24.8.0"
- key: npm-install
use: [code, node]
timeout: 3m
run: npm ci --no-audit --no-fund
filter:
- package.json
- package-lock.json
- key: lint
use: npm-install
timeout: 2m
run: npm run lint
outputs:
problems:
- matcher: eslint
- key: test
use: npm-install
timeout: 2m
run: npm test -- --runInBand --json --outputFile=test-results.json
outputs:
test-results:
- path: test-results.json
```
The `code` and `node` tasks prepare the project and runtime. `npm-install` uses
both. The `lint` and `test` tasks use that prepared environment and can run
independently.
Check the definition:
```sh theme={null}
rwx lint .rwx/quickstart.yml
```
You should see:
```text theme={null}
Checked 1 file and found 0 problems.
```
## 4. Run tests and lint in the cloud
Start the workflow and wait for its result:
```sh theme={null}
rwx run .rwx/quickstart.yml --wait --title "My first RWX run"
```
Wait for the CLI to report:
```text theme={null}
Run result status: succeeded
```
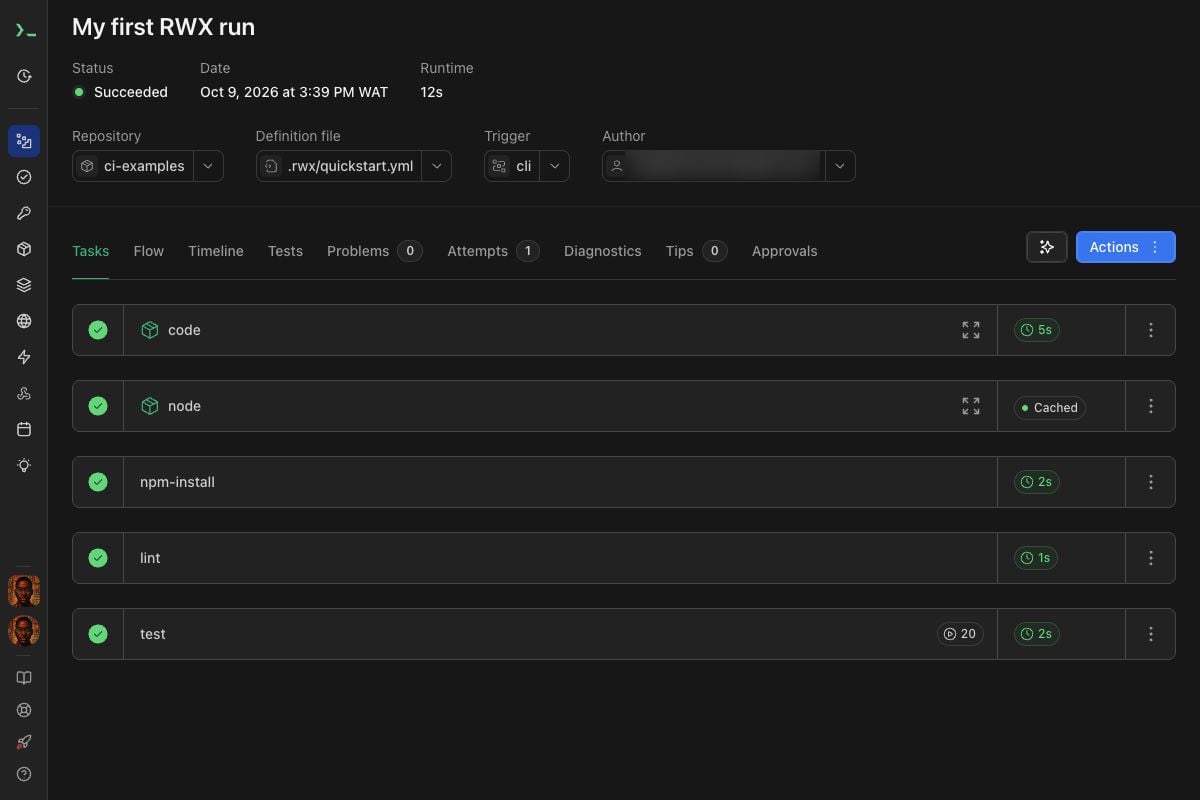
Open the run URL printed by the CLI. In the **Tasks** view, look for these five
tasks:
| Task | Expected result |
| - | - |
| `code` | The example repository is available |
| `node` | Node.js is available |
| `npm-install` | Dependencies are installed |
| `lint` | The lint check succeeds |
| `test` | All 20 tests pass |
The run should show **Succeeded**. If RWX has already run a task with the same
inputs in your organization, that task may show **Cached** on this first run.
The example shows the **Runs** permissions using the `run:` search filter.
Select **Authorize**, then return to your terminal.
Confirm the CLI is signed in:
```sh theme={null}
rwx whoami
```
Check that the **Organization** line names the organization you selected.
## 2. Get the example project
Clone the public example and create a local branch at the version used in this
exercise:
```sh theme={null}
git clone https://github.com/rwx-cloud/ci-examples.git rwx-quickstart
cd rwx-quickstart
git switch --create quickstart 03095ad1675765ff77665ecd0bfeb69ec722cc65
```
The project has 20 unit tests and a lint check. Keep your terminal in
`rwx-quickstart` for the rest of this guide.
## 3. Add the workflow
Create `.rwx/quickstart.yml` and paste in this complete definition:
```yaml theme={null}
on:
cli:
init:
commit-sha: ${{ event.git.sha }}
base:
image: ubuntu:24.04
config: rwx/base 1.2.0
tasks:
- key: code
call: git/clone 2.2.0
with:
repository: https://github.com/rwx-cloud/ci-examples.git
ref: ${{ init.commit-sha }}
- key: node
call: nodejs/install 1.2.0
with:
node-version: "24.8.0"
- key: npm-install
use: [code, node]
timeout: 3m
run: npm ci --no-audit --no-fund
filter:
- package.json
- package-lock.json
- key: lint
use: npm-install
timeout: 2m
run: npm run lint
outputs:
problems:
- matcher: eslint
- key: test
use: npm-install
timeout: 2m
run: npm test -- --runInBand --json --outputFile=test-results.json
outputs:
test-results:
- path: test-results.json
```
The `code` and `node` tasks prepare the project and runtime. `npm-install` uses
both. The `lint` and `test` tasks use that prepared environment and can run
independently.
Check the definition:
```sh theme={null}
rwx lint .rwx/quickstart.yml
```
You should see:
```text theme={null}
Checked 1 file and found 0 problems.
```
## 4. Run tests and lint in the cloud
Start the workflow and wait for its result:
```sh theme={null}
rwx run .rwx/quickstart.yml --wait --title "My first RWX run"
```
Wait for the CLI to report:
```text theme={null}
Run result status: succeeded
```
Open the run URL printed by the CLI. In the **Tasks** view, look for these five
tasks:
| Task | Expected result |
| - | - |
| `code` | The example repository is available |
| `node` | Node.js is available |
| `npm-install` | Dependencies are installed |
| `lint` | The lint check succeeds |
| `test` | All 20 tests pass |
The run should show **Succeeded**. If RWX has already run a task with the same
inputs in your organization, that task may show **Cached** on this first run.
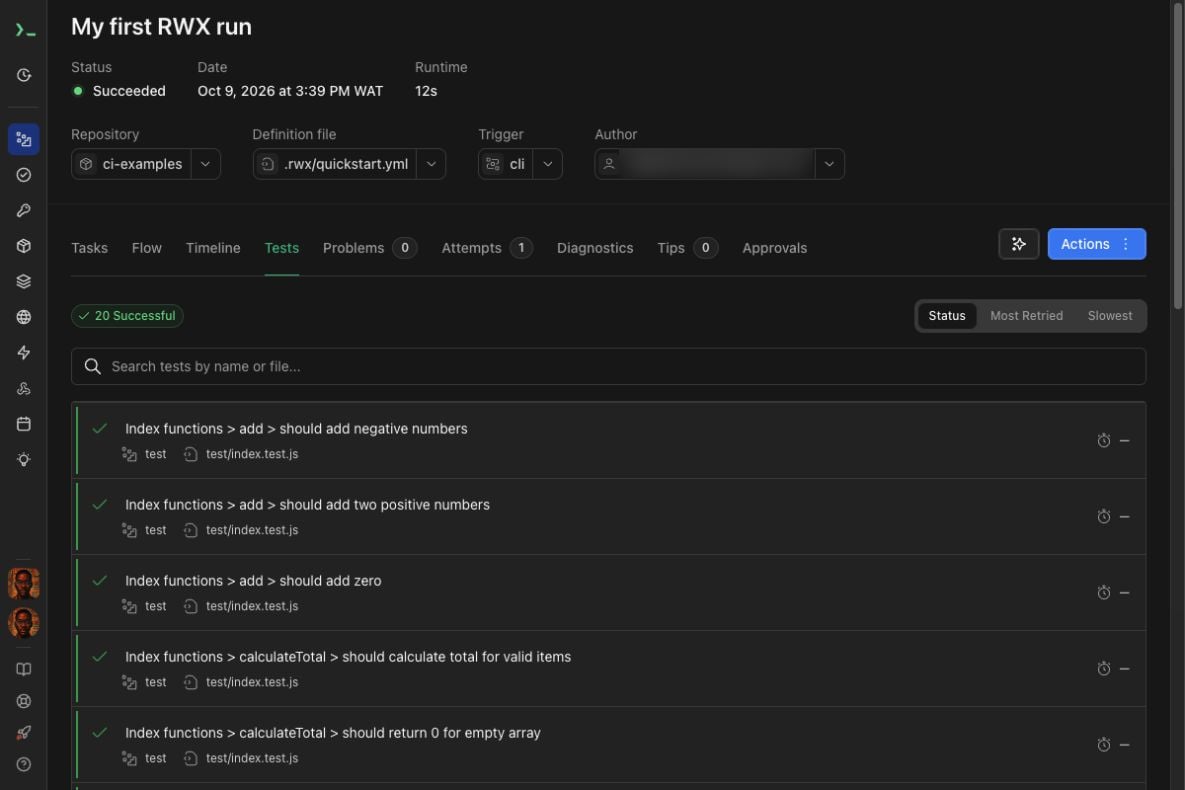
 Select the **Tests** tab to see the individual test results. Look for
**20 Successful** above the list.
Select the **Tests** tab to see the individual test results. Look for
**20 Successful** above the list.
 Your new workflow file is still local. The CLI sends local changes with the run,
so this exercise does not require a commit or push.
## 5. See the cache reuse
Run the same definition again without changing any files:
```sh theme={null}
rwx run .rwx/quickstart.yml --wait --title "My cached RWX run"
```
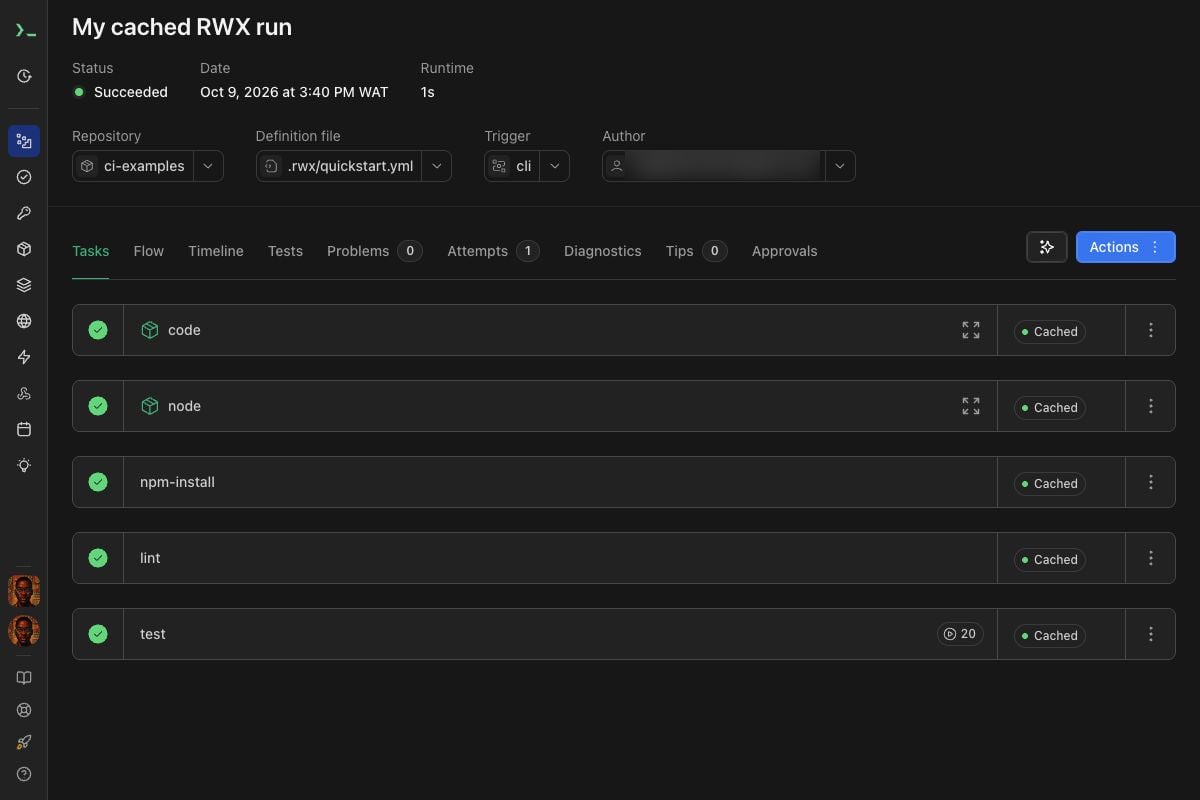
Open the new run URL. All five tasks should show **Cached**, and the run should
show **Succeeded**. RWX reused the earlier successful results because the task
definitions and inputs stayed the same.
Your new workflow file is still local. The CLI sends local changes with the run,
so this exercise does not require a commit or push.
## 5. See the cache reuse
Run the same definition again without changing any files:
```sh theme={null}
rwx run .rwx/quickstart.yml --wait --title "My cached RWX run"
```
Open the new run URL. All five tasks should show **Cached**, and the run should
show **Succeeded**. RWX reused the earlier successful results because the task
definitions and inputs stayed the same.
 You now have a passing cloud CI workflow and have seen it reuse an unchanged run.
## If a step fails
| What you see | What to do |
| - | - |
| CLI authentication is missing | Run `rwx login`, complete browser authorization, and check `rwx whoami` |
| The run is paused for account verification | Finish the verification in RWX onboarding and confirm trial credit is available |
| The CLI cannot determine a remote Git commit | Run the command inside `rwx-quickstart` after the clone and branch commands in step 2 |
| The definition has lint errors | Compare `.rwx/quickstart.yml` with the full definition in step 3, then run `rwx lint` again |
| A task fails | Open that task in the run UI and inspect its output; use the Tests tab for test failures |
## Continue with your project
Continue learning with [Catch and fix a local regression with RWX](/test-local-changes)
or [Run commands in a cloud sandbox](/cloud-sandbox).
Use the [CI workflow guide](https://www.rwx.com/docs/guides/ci) to point the
workflow at your own repository and checks. For a private GitHub repository,
follow [Getting started with GitHub](https://www.rwx.com/docs/getting-started/github)
to grant repository access and configure the clone token.
This documentation is built and hosted on [Mintlify](https://mintlify.com), a developer documentation platform.
You now have a passing cloud CI workflow and have seen it reuse an unchanged run.
## If a step fails
| What you see | What to do |
| - | - |
| CLI authentication is missing | Run `rwx login`, complete browser authorization, and check `rwx whoami` |
| The run is paused for account verification | Finish the verification in RWX onboarding and confirm trial credit is available |
| The CLI cannot determine a remote Git commit | Run the command inside `rwx-quickstart` after the clone and branch commands in step 2 |
| The definition has lint errors | Compare `.rwx/quickstart.yml` with the full definition in step 3, then run `rwx lint` again |
| A task fails | Open that task in the run UI and inspect its output; use the Tests tab for test failures |
## Continue with your project
Continue learning with [Catch and fix a local regression with RWX](/test-local-changes)
or [Run commands in a cloud sandbox](/cloud-sandbox).
Use the [CI workflow guide](https://www.rwx.com/docs/guides/ci) to point the
workflow at your own repository and checks. For a private GitHub repository,
follow [Getting started with GitHub](https://www.rwx.com/docs/getting-started/github)
to grant repository access and configure the clone token.
This documentation is built and hosted on [Mintlify](https://mintlify.com), a developer documentation platform.